This page is generic and related to ubiFLEET & ubiSMART products
The Point of Interest (POI) page allows you to create, edit, delete, and manage points of interest and geographic areas (called geofencing zones) that your assets travel near. This will allow you to create smart alerts or passage reports based on these definitions.
- A Point of Interest (POI) is a single point on the map, which can indicate an interest in a specific address (of a customer, subsidiary, supplier, etc.) or any geographical location you wish to mark on the map.
- A geofencing zone (GFZ) is an area of interest on the map, usually surrounding a point of interest (POI).
A geofencing zone is always built around a POI.
Several GF’s can be associated with the same point of interest, but not every POI must have a GFZ.
P.O.I.
P.O.I. screen
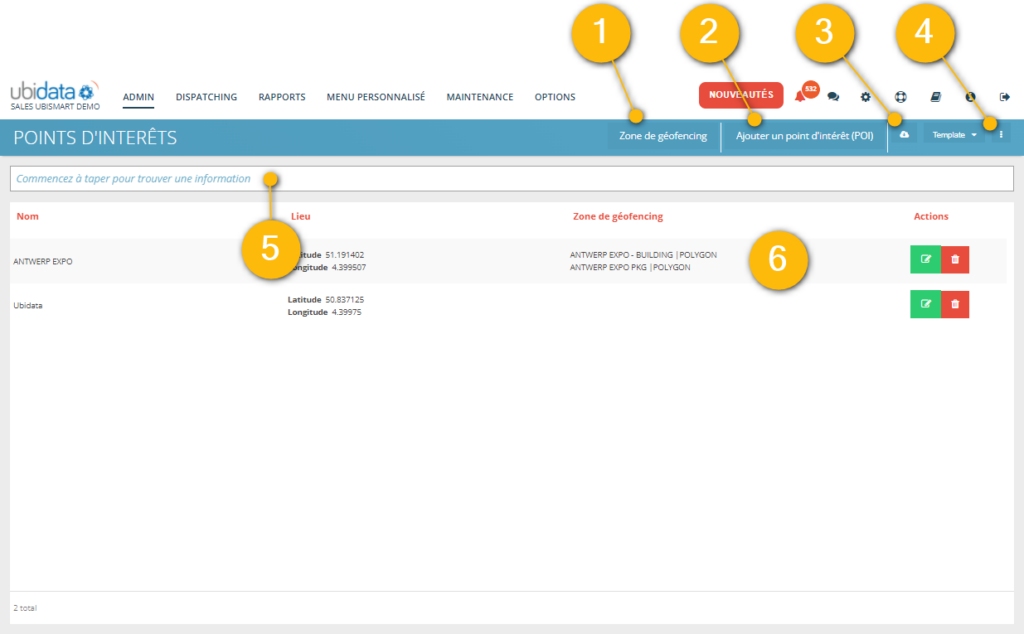
When you open ADMIN / POI page, the POI screen opens by default. It lists all existing POI’s that have been created in your project:

The page is composed of the following elements:
(1) a ‘Geofencing Zone’ button in the Title Menu to switch to the GF page
(2) an ‘Add POI’ button in the Title Menu to create new POIs
(3) an ‘DOWNLOAD’ button in the Title Menu to export part or all of the POI table to a file
(4) The ‘TEMPLATE‘ and ‘COLUMN SELECTOR‘ buttons in the Title Menu – (follow link to read more)
(5) SEARCH BAR – to quickly find specific information, type the word you are looking for into the search field. The rows in the table are dynamically filtered as you type.
(6) The results table with 2 possible actions in action column:
- MODIFY: opens the POI EDITION page where you can rename, attach a category, share, display on map and add 1 or more attached GF
- DELETE: permanently delete the P.O.I.
Dataset

The P.O.I’s are listed with
- the name you gave to the P.O.I which is a physical address (can be a client name, a warehouse name, a dangerous sport, etc.)
- the physical address
- the name of associated GF zones (their can be more than 1)
- Location, which are the X/Y coordinates in LB72 format
- The name of the user that last modified the record, as well as the sharing state
When you click on the ‘CREATE’ or ‘MODIFY’ button, the P.O.I. edition page opens.
POI edition

POI information
Here you can assign a name to the POI and link to a category.
The category can be seen as the “group” to which the POI belongs. The POI’s are listed by group in the tree view of the map. If you want to create a new category, click on the ‘+’ icon.
You can decide to share the POI with the other users of the project, or keep it only visible for you.
You can decide to show the POI on the different maps, or hide it by default.
.
POI Location
In this section, you can place a P.O.I. on the map. You are given several ways to do so:
- Place marker on the map: Click anywhere on the map (4). Once appearing on the map, you still can move with a DRAG & DROP. A click on the map will zoom in and propose to relocate the POI.
- Find by address: enter the physical address (the search is based on Google maps search capabilities and might fail to find the requested address)
- Entity location: You know the current location of one of your assets (listed by name)… you can decide to use it. Click here to know more about Entity management
- GPS coordinates: Enter the geographical (GPS) coordinates (longitude/latitude) in LB72 format


Geofencing Zone
Once a POI is placed on the map (4), you can associate one or more GF zones.
All associated GF will be listed in this frame after creation.
Geofencing zones (GF)
Creation of a GF
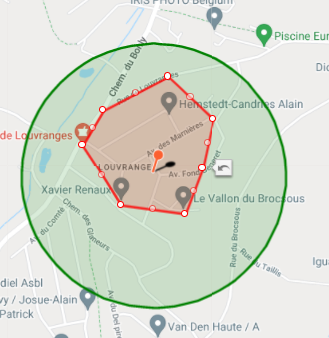
A GF is a surface in neighborhood of an existing POI. It can be circular or polygonal.
circular GF
Creating a circular zone means defining a point close to the P.O.I and a radius around this point.
The zone must not especially be centered around the P.O.I., you can DRAG & DROP the GF to embrace the zone you want to cover in the neighborhood of the POI.
Once the zone created on the map, you also can easily adapt radius with the mouse.
polygonal GF
Creating a polygone means adding singles points to delimitate the GF area.
To add a polygonal GF, click on the Add Polygonal Zone button.
To position the polygon, place the points delimiting the area by left-clicking on the desired locations on the map.
To close the polygon, click on the first point you positioned once again.
When the polygon is complete, you can always drag it elsewhere on the map and reshape it.
You can add as many different types of GF as you want, they will overlay in the system.
Make sure you differentiate them properly to further use them in the project as needed

Management of geofencing zones
Click on the button located in the title bar (top right corner) to open the GEOFENCING ZONE page:

It will list a set of records, one line per existing GF.
The dataset table works as the POI dataset table.
To go back to the POI page, click on the POI button in the top right corner of the page.
Corridorfencing
The corridor fencing is a very specific fencing zone that follows a specific route.
The definition of such a zone is made on another page, please refer to ADMIN / Corridorfencing:
How to best make use of POI & GF?
Now you have created your POI and GF, you might want to know how to best take advantage of these….
